The two alternate titles of this post are Everything I know about running your own VPS or Host a pile of your high-traffic WordPress sites for just $5/mo, but let’s go with what we have.
A few months back, after scrolling over enough promoted tweets from Digital Ocean in my timeline, I got curious enough to spend the $5 for the basic plan and sign up. At that point I was simply interested in seeing what they had to offer — see what their interface was like, see what WordPress felt like on an SSD, etc. I certainly wasn’t intending on spending hours and hours tuning and tweaking and configuring, but yet that’s exactly what I did.
Surviving a Hacker News spike
When Throwing in the Towel on Programming hit Hacker News, I was at home cooking supper and playing with Jack. I happened to check in on the traffic about half-way through the spike and could see that things were humming along perfectly well. In the end, I had almost 10k visits in the span of less than 2 hours. Not huge traffic by any stretch, but more than most small blogs like this get in the run of a few hours. In the time since, I’ve done all kinds of additional tweaking and tuning, and I think at this point I could serve much much more traffic without the server breaking a sweat.
But that’s the end of the story. Let’s start at the beginning!
Setting up your new VPS
I chose Digital Ocean (DO) because of that enticing $5 gateway. You could absolutely go with Linode as well — I have no preference and have used and liked both. Here’s what I did at DO:
- Install Ubuntu (12.04 in my case)
- Install the lamp stack I need to run WordPress
- Setup my dotfiles
- Install wpcli
- Setup a new virtual host for a WordPress site
- Install WordPress! (though I did this mostly through wpcli
- Profit!
And basically that was it, all except for step #7. Turns out that even on a fresh server install on a blazing fast SSD, things were moving extremely slowly. I was trying to import some .xml export files from some of my sites and MySQL kept falling over and needing to be restarted, and things generally were not going well. It made no sense to me — I had a brand new setup, on a very fast hard drive but my one single site was just crawling along. That’s when I hit #digitalocean on Freenode to get some help.
The good folks in #digitalocean were extremely friendly and helpful. Not all IRC channels are friendly to beginners—that’s an understatement—but DO’s certainly was. They helped me with my initial setup and are still helping me today with the more complicated stuff I run into. Before hitting a wall and giving up, you should definitely head over there and start asking for help.
Tweak and Tune
After a considerable amount of time spent reading and asking questions on IRC, I had a good sense of what I needed to do to make my server perform. Here’s roughly what I did:
- Tune Apache
- No, I mean, really tune Apache
- Spend an entire day reading about KeepAlive
- Keep reading about KeepAlive
- Tune MySQL
- Loose sleep over setting the ideal key_buffer_size
- Install MySQLTuner (you should let MySQL run for 24hrs or more before acting on the recommendations this gives you
After I went through all of this, performance really picked up. MySQL wasn’t falling over while doing relatively simple tasks, and things were generally much much faster. But how fast? How could I tell that everything was performing better?
Tools of the Trade
The hardest part of the learning curve to running your own VPS is getting a handle on the tools you have available to you. Understanding how much memory you have and how much you’re using at any one time is the big one, and that took me a while to catch on to. Basically there’s two main commands/tools that you’ll want to keep an eye on. Every morning when I get into work, I’ll open up two terminal windows and run two commands to see how things are doing:
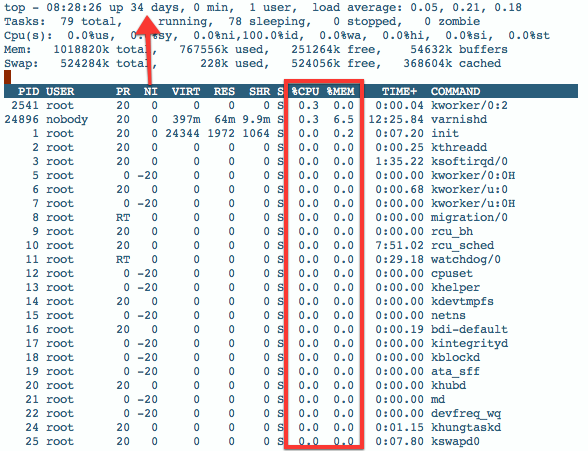
1. top
Just log in to your VPS and run the command ‘top’. That should fill your screen with a whole pile of info. Everything from how long your server has been “up”, how much memory you’re using, what processes are running and what % of CPU power they’re using. I like to sort the processes by %CPU or %MEM — do that by typing Shift+O then either n or k.
Here’s what that looks like :
2. free -m
Top gives you a sense of how much memory you’re using at any one time, but keeping an eye on free is a better way. Just type that into your terminal and see the how much memory you’re using. The output looks like this:

The line you’ll want to look at here is the second one:
-/+ buffers/cache: 339 655
This is telling me that I’m currently using 339MB of memory and have 655MB free. I’ve recently upgraded to the $10 plan, so that’s why I have 1024MB (1GB) of memory and not 512MB. But that’s what you’ll want to look at. Of course you’re not going to want to have to keep typing that free -m command every time you want to see how much memory you’re using, so you should watch it instead:
watch -n 10 free -m
That will run this command for you every 10 seconds.
Ok, so let’s recap where we are. We’ve got a lamp stack installed on Ubuntu, created a virtual host, got WordPress installed, and we’ve got Apache and MySQL all tuned up and ready for another Hacker News spike. The only thing is, how do we know we’re ready? How do we test that everything we’ve done has helped? I’m still struggling with this part a little myself, but I’ve come up with a few strategies.
Load Testing
I use two tools for testing:
This is a system tool that will let you send traffic from your desktop to your server. To use it, logout of your VPS and try sending some requests along. I use something like this:
ab -n 1000 -c 50 http://waterstreetgm.org/
This simulates requests (1000) and concurrent users (50) to your site. The output looks like this:
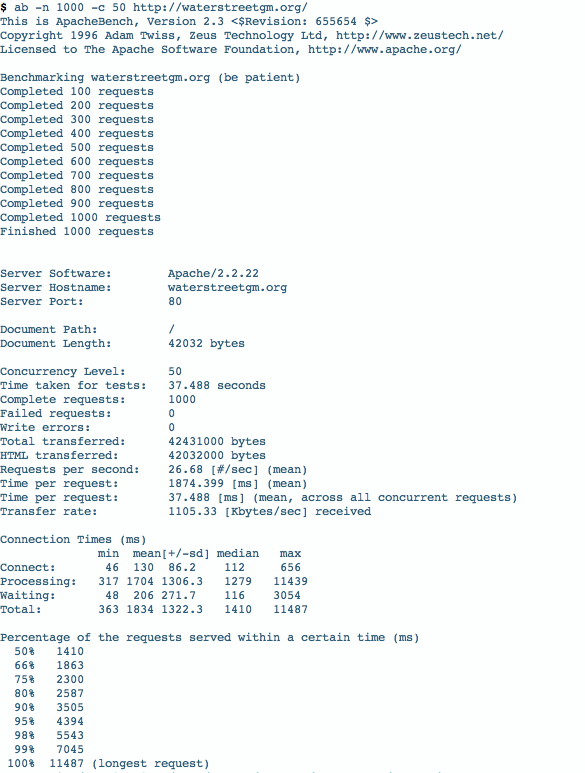
That’s a lot of information there. A few key lines to look at are your Request per second and the percentages at the bottom. The 50% 1410 is telling me that 50% of the 1000 requests were served to my visitors in less than 1.4s, which isn’t too bad. I’d like to get the mean time per request down a little lower (1874ms or 1.8s) but it’s still pretty good.
Blitz is an extremely neat tool. This does a more real-world benchmark than Apache Bench does. It rushes your site with traffic and gives you a report of how you did. My report currently looks like this:
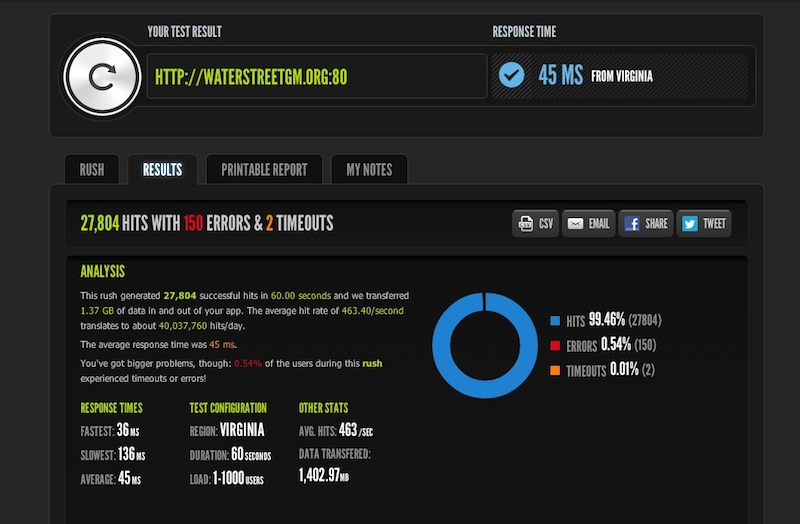
Blitz is suggesting that I survived 463 hits/s, and that my site could handle 40M hits/day (!), which seems a bit insane to me. That said, this one rush sent 27,804 hits to my site in 60s and I handled that no sweat, so maybe I could handle 40M visits per day.
How do I know it was no sweat? While running this Blitz, I have two terminal windows open running free -m and top so I can see what’s happening. Here’s what that looked like during this rush:
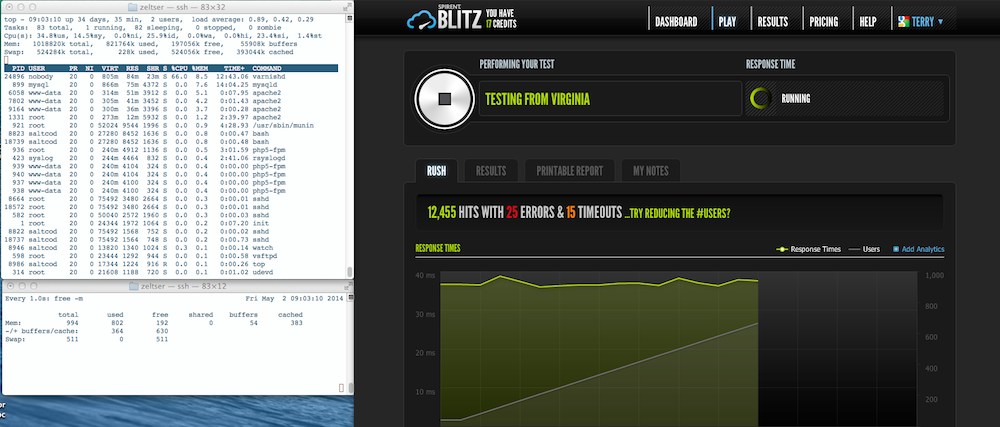
It’s a little hard to see the output in the terminal windows there, but the top CPU-consuming application during this blitz was Varnish, and on the bottom you can see that during all this I was still only using around 364MB of memory—I noticed virtually no spike in memory use during this test. That’s pretty neat. I’m also this close to scrapping the Apache setup altogether and taking Nginx for a spin—but that’s a conversation for another day.
Oh yeah, I installed Varnish here too, forgot to mention that! Honestly, at this stage, I still don’t know enough about Varnish to comment on the performance gain. I know it’s supposed to be a magic unicorn for managing traffic, but I don’t know too much about it yet. What I do know is that when I finally got Varnish setup and running properly, I tailed my mysql log and did the Apache Bench and Blitz testing and found that there were no (zero!) requests going to MySQL. Whether that has to do with WP Super Cache or Varnish, I’m honestly not sure. I hope to read much more about this in the coming weeks.
And that’s about it! With a finely tuned lamp stack, you really can serve a huge pile of traffic from just a 512MB, $5 VPS. It will take some time and effort, but you’ll learn a ton along the way. I will point out one caveat with this though: the need for speed is addictive. I started out just wanting to see what Digital Ocean was like a month later I’m editing a Varnish vcl file and sweating page load times over 500ms. But the good news is that it’s actually a lot of fun along the way. Enjoy!