Posts Tagged: WordPress

Make your WordPress themes reusable

A brief chat with Matthew just highlighted something that might not be obvious to all WordPress users: why you want to keep theme pieces generic and reusable. WordPress has a pile of functions baked in to make it easy for you to get content out of your loops without having to do a lot of programming.

Let’s use an example: linking your site’s name to the frontpage of your website. Of course this is something you’re already familiar with, just making a simple link to your domain name.

It’s as easy as writing

<a href='http://my-awesome-website.com'><h1> My Awesome Website </h1> </a>

All we’ve done here is made our site name an H1 and linked it to our domain name. Paste that into the right spot in header.php and we’re done for the evening.

But there’s a better way. Next time, when you’re coding a site for a friend or client, you’ll need to change http://my-awesome-website.com to http://another-mindless-website-for-corporate-america.com manually. It’s not a big deal, but every second counts these days. Instead of baking the site name right into the header template file, use the WordPress function bloginfo() for guaranteed reusability. Like so:

This will grab the name of your site:

<h1><?php bloginfo('name'); ?></h1>

This will get the url of the homepage:

<?php php bloginfo('url');  ?>
 

And finally, this will pull it all together and make the link work:

<a href="<?php bloginfo('url'); ?>" title="<?php bloginfo('name'); ?>"><?php bloginfo('name'); ?></a>

All that goodness came from just one single function, bloginfo().

Starting a new website or theme is a pain. You need to go through and setup the site name, the url, the contact info, etc, etc. If you use the built-in WordPress functions in your themes you’ll save time and frustration down the road. Keeping as much of your themes as generic as possible will make them more reusable and make that first hour with a new theme a lot less of a chore.

Ps: There’s a lot of other handy functions available for you to use. WordPress calls them Template Tags. Happy theming.
Creating and Displaying custom post types

Custom Posts introduced in WordPress 3.0 give you the ability to create more than just blog posts. You can now create separate post types for all your content—photos, recipes, labels from your uncles 8-Track collection—you know, anything you can think of. This involves just two steps: Making a new post type and displaying the new posts.

  1. First we need to tell WordPress about your new post type. Paste this into your functions.php file. If the file already has some code in there, omit the opening and closing PHP tags, if it doesn’t leave them in. If your theme doesn’t yet have a functions.php file, go ahead and make one. Functions.php should only have one set of opening and closing PHP tags.
  2.  
    		<?php
    			add_theme_support( 'menus' );
    			add_action( 'init', 'create_my_post_types' );
    			function create_my_post_types() {
    				register_post_type( 'recipes',
    					array(
    						'labels' => array(
    							'name' => __( 'Recipes' ),
    							'singular_name' => __( 'Recipe' )
    						),
    						'public' => true,
    					)
    				);
    			}
    		?>	 
    	
  3. Second (and last, whoot!) we want to display our new recipes for all the world to see, cook and enjoy. Paste this code anywhere you want to display your favourite recipes (may I recommend sidebar.php):
  4. 	<?php $loop = new WP_Query( array( 'post_type' => 'recipes', 'posts_per_page' => 10 ) ); ?>
    	<?php while ( $loop->have_posts() ) : $loop->the_post(); ?>
    
    	<?php the_title( '<h2 class="entry-title"><a href="' . get_permalink() . '" title="' . the_title_attribute( 'echo=0' ) . '" rel="bookmark">', '</a></h2>' ); ?>
    
    	<div class="entry-content">
    		<?php the_content(); ?>
    	</div>
    	<?php endwhile; ?>


    Hat-tip to Justin Tadlock for this and many more great WordPress tricks.

Simple new way to download WordPress: a shell alias

By accident or not I’m not sure, but WordPress conveniently links to the newest version using the same link: latest.tar.gz. Instead of having to go to WordPress.org to grab the link every time, just make an alias to it and put in your .bash_profile:
  1. Open a Terminal window and type:  edit ~/.bash_profile
  2. Add the following code on two blank lines:
#download latest WordPress
alias wplatest='wget http://wordpress.org/latest.tar.gz'

Then close the file, open a new Terminal window, and browse to the directory you want to install WordPress in. When you get there, just type ‘wplatest’ to download the magic.

Theme individual Posts in WordPress

In Drupal, theming each node (post) individually was an out-of-the-box feature. Unless I’m missing something, WordPress doesn’t have this functionality yet. Luckly, Justin Tadlock has a perfect solution. You can go through the steps there, but it basically involves including a function in functions.php that checks for a single-post_ID.php file in your theme folder. If you want to completely change the function and form of post #341, just create single-341.php file and theme it as you would a normal single.php file.

For a several examples of why you would want to do this, just visit Jason Santa Maria’s site—it’s brim-full with individually styled posts. Though his website looks to be hand-crafted, it’s easy to do in WordPress now too.

Add a byline to your posts

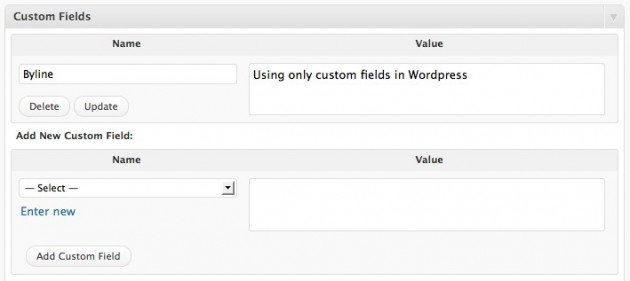
Every good post needs a good byline (the purple sub-heading above). With WordPress, it’s easy to setup:

1. First things first, you need make a new custom field. This is right at the bottom of the Add New Post page.

2. Next, add a little piece of code to the loop sections of the appropriate files in your theme (single.php, index.php, single.php, page.php, etc). Be sure to place this right before the $the_content() function.

	<?php if ( get_post_meta($post->ID, 'Byline', true) ) : ?>
      <div> <?php echo get_post_meta($post->ID, 'Byline', true) ?></div>
    <?php endif; ?>
	

This tells WordPress to look for a byline before printing out the rest of the content in your post.

3. Last, a little bit of CSS to make things look right and you’re all set.

.byline {
	font-size: 13px;
	font-style: italic;
	color: #CB1C9E;
	margin-bottom: 25px;
	}

This technique will work for any kind of custom content—just replace the word ‘byline’ in the function above, with the name of your custom field.